Hippos: My Introduction to the World of 3D Scanning

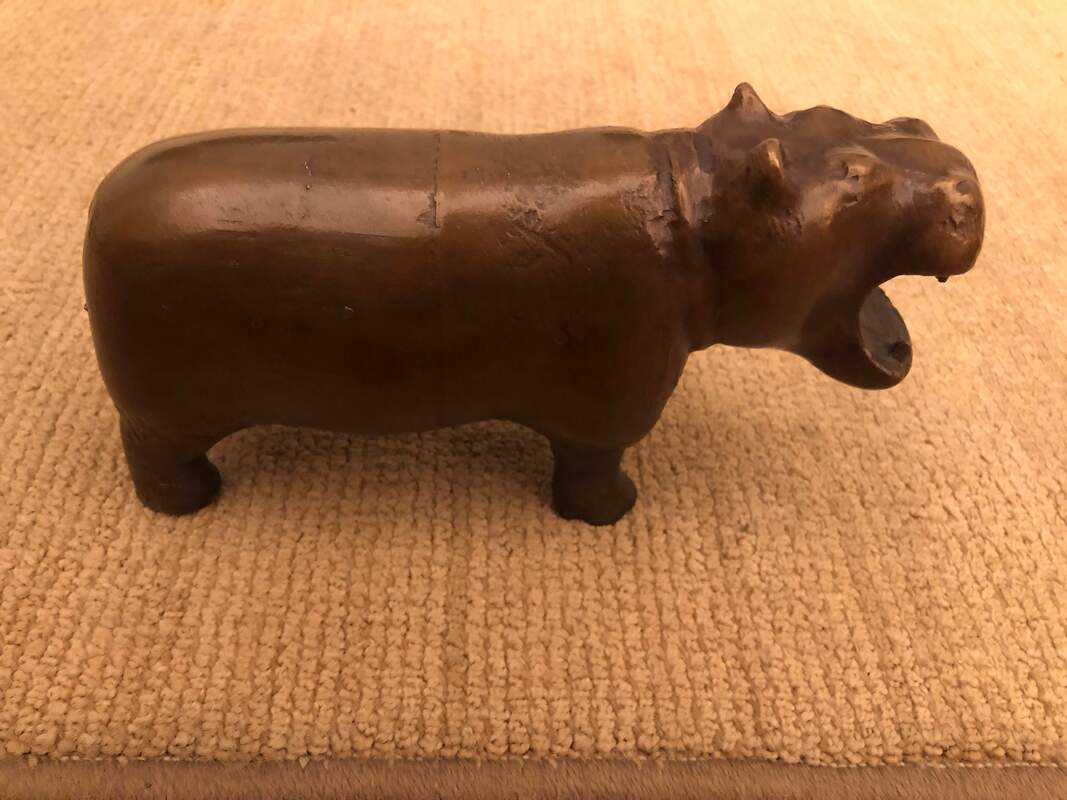
Isn't he cute?
A few years ago, my Dad brought home a carving of a hippo made by a friend's ranch-hand in Zimbabwe. The little guy has since lived on my desk, far away from the African climate that he was accustomed to. One day it struck me that he must have been lonely, with no other hippos to keep him company. I wanted to get him a twin hippo, but carving was not an option for me... I don't think he'd recognize the result! Instead, I decided to use my newly-acquired NextEngine 3D scanning system (snagged used from eBay) and a 3D printer.
the process
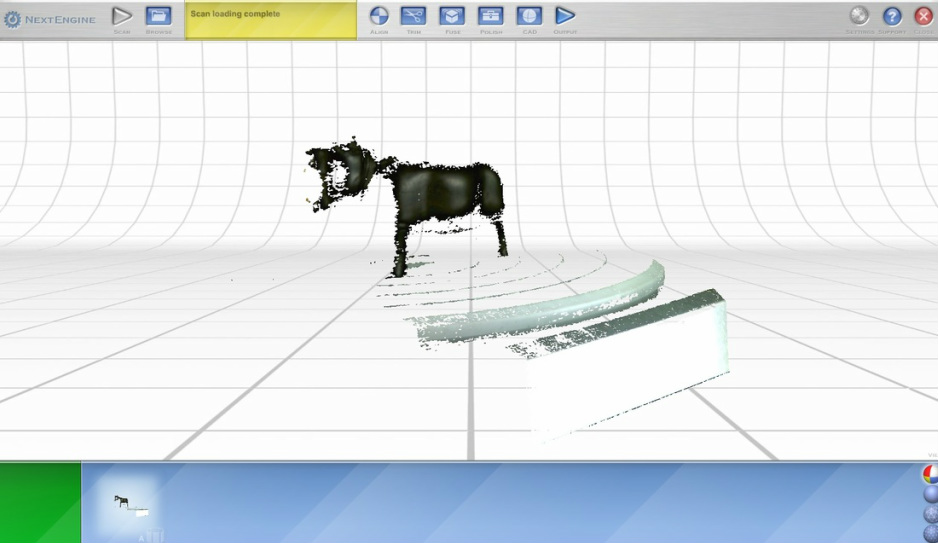
The scanning process turned out to be anything but easy... as you can see from the image below, each individual scan yielded very little usable information. After countless hours of troubleshooting, scanning, and adjusting, I learned several things:
- The little zero-backlash gear drive system within the scanner needed lubrication. This was responsible for several pesky artifacts.
- Powdering the hippo with some baby powder or matte makeup helped the scanning process out significantly. Materials that are too dark or highly reflective do not tend to scan well; the buffed hardwood hippo was both dark and reflective.
- It's all about patience. Getting scans from as many angles as possible is helpful. By the time the process was done, I had collected some 1.5Gbs of scan data!
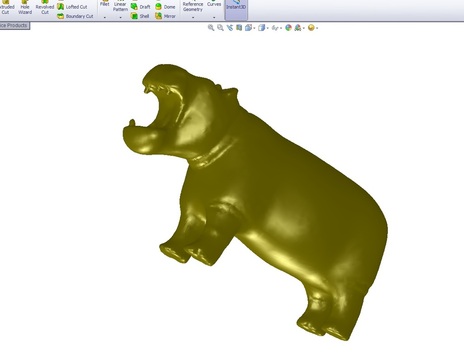
The data from a single scan isn't terribly useful. The magic comes when you mesh several (in my case about 15) of these scans together, using virtual alignment pins, to arrive at the final solid model.
The result, arrived at after a week or so of tedious work, was glorious. Note that, even after the scan looked good within the scanning software package, it required additional work to make the STL watertight. Doing so, as I learned, was the first step in creating a solid model that could be imported to a CAD program like Solidworks, which I then used to make the model hollow so that it could be printed by a service such as Shapeways more inexpensively.
Isn't she a beauty?
|
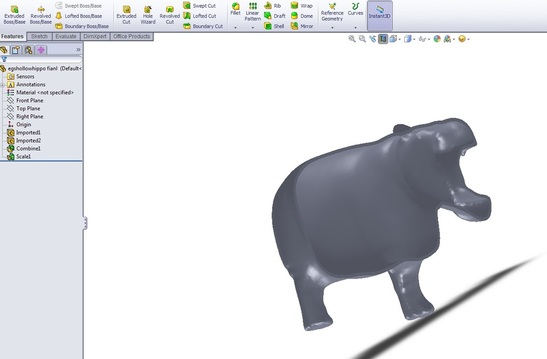
A sectional view to shows its hollow interior. I ended up using a boolean "combine" operation (subtraction) to arrive at this form, as the "hollow" feature in my CAD program was being too picky.
|
|
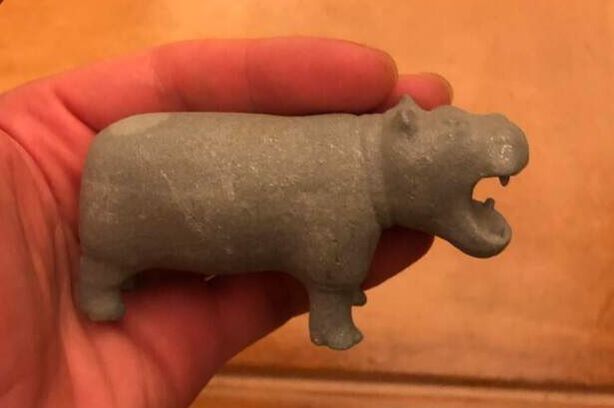
Finally, the time came to create hippos to keep my original friend company. My first print was produced by Shapeways at 100% scaling in their "alumide" material, which I think is a nylon and aluminum blend, fused into its final form using an SLS process. That model turned out great.
|
|
My second hippo was produced at home, on my very own 3D printer (at the time a modified BFB 3D Touch) out of PLA. Once it was done, I carefully sanded it and filled in any low spots with a wood-filler. I sent the finished model to a local foundry, where they performed a lost-wax (really lost-PLA) process. The result was my very own solid bronze hippo, weighing in at a whopping 15lbs!

|
|
5 Years Later....
Hippos are something that I can't get enough of. Like cookies! So this year (2020), while sheltering in place, my mind eventually drifted to the topic of art and hippos. What more could I make with this same scan that I love so much?
Instead of going big, I decided to use precious metals (so naturally, to stay within a reasonable budget, they'd have to be small). In addition to all of my other interests and hobbies, I've been a bit of a nut for precious metals and gems. I am fascinated by their beauty, and also by their stability: gold in particular, as a metal that never tarnishes and can be re-melted and formed indefinitely, is just so cool. But if I was going to melt down a gold coin to make a hippo, it better have a cool base to stand on. So I got to work!
Inspired by the top of the caviar dish that I made earlier, I decided that it would be cool to make a wavy (rolling hills) sort of surface that the precious metal hippos could stand atop. Note: I know that hippos are usually underwater, and don't graze on prairies like cows... but these hippos would be special in more ways than their metallic basis! I eventually settled on making the base out of walnut, with a "river" of metal running through it (inspired by the work of Hilla Shaia, which had also guided my earlier candlestick base).
Making the base was the fun part, summarized in the photos below. It started with an 8" diameter by 3" tall black walnut turning blank that I got on eBay, which was bolted to a (3D printed) fixture that fit in my vise. I then faced the blank to a more reasonable height of about 1.5". Then I milled out a pocket, and roughed up the sidewalls of said pocket with a Dremel tool for the metal inlay to bite into. I poured the bismuth alloy (which melts at about 300F) into the pocket, which acted as a self-contained mold for the alloy. Once that was cool about 1 eternity later, I used a contour path to remove the edges of the disk, resulting in a ~6.75" final diameter wooden disk, with the metal river flowing edge to edge. Then I got to work roughing the 3D surface (stepwise) with the same 3/8" flat endmill. It was apparently pretty dull, as evidenced by all of the splintering. Finally, I swapped the flat endmill out for a ballnose endmill, and ran a finish surface program to achieve the final 3D surface that I was after.
While I was busy making the base, a professional jeweler was busy helping me with the metal castings (I wish I could do that part myself as I find it fascinating, but I know my limits --- and literally couldn't afford to mess it up and loose any gold!) His process is summarized in the same slideshow, and started with 3D printed wax masters and a few silver, gold, and platinum coins that I had collected over the years but wasn't terribly attached to.
I couldn't be happier with the final result. Whether friends understand my obsession with hippos or not, I think everyone can agree that the result of this COVID boredom was unique, fun, and valuable (by definition, thanks to the metals used!)
|
|
|